ADRCI – Auto Purge Old Trace and Incident files
How to purge Oracle trace files through adrci
What is ADRCI?
How to purge Oracle trace files through adrci
What is ADRCI?
ADRCI is a new feature introduced from 11G onwards. It is used to deal with diagnostic information.
It has multiple features such as:
- Analyze diagnostic data within the Automatic Diagnostic Repository (ADR).
- Create a package with incident/problem information for Oracle Support.
- Auto purge of old diagnostic files.
Auto purge of old Diagnostic files:
One of the feature of ADRCI is to purge the old diagnostic information/files. This is controlled by two parameters in ADRCI utility.
- SHORTP_POLICY: Which is used for automatically purging short-lived files, i.e. core dump files and traces, expressed in hours and defaults to 30 days.
- LONGP_POLICY: Which is used for automatically purging long-lived files, i.e. incidents and health monitor warnings, expressed in hours and defaults to 1 year.
How the purge cycle is defined:
The auto-purge will ONLY purge every 7 days and this has always been the way it was designed. It then uses the SHORTP_POLICY and LONGP_POLICY values to determine how much information to purge. The ADR purge is run towards the end of the regular AWR purge.
There is no control on the purge frequency, it is fixed to be 48 hours after startup and then every 7 days. Manual purge is the only way to control purge actions in between.
Some commands for ADRCI:
Set environment variable
Set environment variable
. oraenv
SID
SID
After set environment Enter adrci command to connect adrci prompt
[oracle@prod ~]$ adrci
ADRCI: Release 11.2.0.1.0 – Production on Mon Feb 6 00:42:15 2017
Copyright (c) 1982, 2009, Oracle and/or its affiliates. All rights reserved.
ADR base = “/u01/app/oracle”
ADRCI: Release 11.2.0.1.0 – Production on Mon Feb 6 00:42:15 2017
Copyright (c) 1982, 2009, Oracle and/or its affiliates. All rights reserved.
ADR base = “/u01/app/oracle”
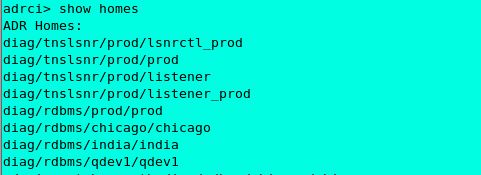
Adrci> show homes (This command will list all the available database trace directories.)
adrci> show homes
ADR Homes:
diag/tnslsnr/prod/lsnrctl_prod
diag/tnslsnr/prod/prod
diag/tnslsnr/prod/listener
diag/tnslsnr/prod/listener_prod
diag/rdbms/prod/prod
diag/rdbms/chicago/chicago
diag/rdbms/india/india
diag/rdbms/qdev1/qdev1
ADR Homes:
diag/tnslsnr/prod/lsnrctl_prod
diag/tnslsnr/prod/prod
diag/tnslsnr/prod/listener
diag/tnslsnr/prod/listener_prod
diag/rdbms/prod/prod
diag/rdbms/chicago/chicago
diag/rdbms/india/india
diag/rdbms/qdev1/qdev1
Adrci> set homepath <home path to set>(This command will use to set a specific home value (trace directory)
adrci> set homepath diag/rdbms/chicago/Chicago

Adrci> show control
This command will list the settings of “shortp_policy”, “longp_policy” and when was the last auto purge happened.
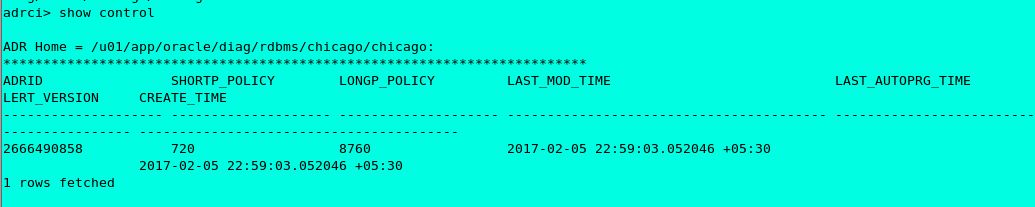
adrci > set control (SHORTP_POLICY = 168)
adrci> set control (LONGP_POLICY = 168)
This command is use to reset the short policy and long policy and this is set in hours.
After set control now sort policy and long policy is 168hr /7 days.
Adrci>Show control
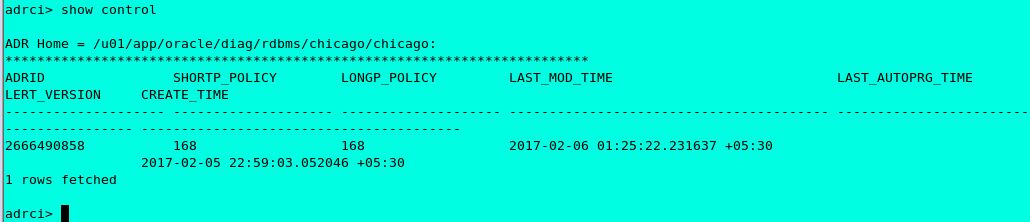
SHORTP POLICY (ADRCI SETTINGS) –
168 hours / 7 days (will keep last 7 days of files and delete all)
168 hours / 7 days (will keep last 7 days of files and delete all)
LONGP POLICY (ADRCI SETTINGS) –
168 hours / 7 days (will keep last 7 days of files and delete all)
168 hours / 7 days (will keep last 7 days of files and delete all)
ADRCI SETTINGS and PURGE:
Adrci> set homepath <home path to set>
adrci > set control (SHORTP_POLICY = 168)
adrci> set control (LONGP_POLICY = 168)
adrci > set control (SHORTP_POLICY = 168)
adrci> set control (LONGP_POLICY = 168)
Purge – this will purge all the files by keeping last 7 days of files.
Adrci> purge
Manually purge the traces-
Adrci> purge
Manually purge the traces-
Adrci> help
Use to get help on commands.
Use to get help on commands.
====================================================
Automatically purging
Sometimes we are facing with space related issues due to the huge number of trace file generation. Automatic purging can help us in this situations if set short retention time for trace files.
- Type show homes to see current homes supported by ADRCI and set homepath.
adrci> show homes
ADR Homes:
diag/rdbms/db12c_stby/db12c_stby
diag/rdbms/db12c_stby/db12c
diag/rdbms/db12c_stby/DB12c
diag/tnslsnr/Standby/listener
diag/clients/user_oracle/host_2436394132_82

adrci> set homepath diag/rdbms/db12c_stby/db12c_stby
- The automatic purging runs on schedule defined in retention policy .To check current policy for home, we can use two methods :
adrci> show control ADR Home = /u01/app/oracle/diag/rdbms/db12c_stby/db12c_stby: ************************************************************************* ADRID SHORTP_POLICY LONGP_POLICY LAST_MOD_TIME LAST_AUTOPRG_TIME LAST_MANUPRG_TIME ADRDIR_VERSION ADRSCHM_VERSION ADRSCHMV_SUMMARY ADRALERT_VERSION CREATE_TIME -------------------- -------------------- -------------------- ---------------------------------------- ---------------------------------------- ---------------------------------------- -------------------- -------------------- -------------------- -------------------- ---------------------------------------- 3514698554 720 8760 2016-05-31 00:54:57.566484 +05:00 2016-07-07 23:27:37.789953 +05:00 1 2 82 1 2016-05-31 00:54:57.566484 +05:00 1 rows fetchedoradrci> select SHORTP_POLICY,LONGP_POLICY from ADR_CONTROL; ADR Home = /u01/app/oracle/diag/rdbms/db12c_stby/db12c_stby: ************************************************************************* SHORTP_POLICY LONGP_POLICY -------------------- -------------------- 720 8760 1 rows fetched
By default retention is 720 hours for short policy and 8760 hours for long policy.
Short policy include the following files :(Trace files, Core dump files, Packaging information)
Long policy include the following files:(Incident information, Incident dumps, Alert logs) - To change the retention policy :
adrci> set control (SHORTP_POLICY=120); -- 5 days

adrci> set control (LONGP_POLICY=720); -- 30 days


--check changes

adrci> select SHORTP_POLICY,LONGP_POLICY,LAST_AUTOPRG_TIME,LAST_MANUPRG_TIME from ADR_CONTROL;

ADR Home = /u01/app/oracle/diag/rdbms/db12c_stby/db12c_stby:
*************************************************************************
SHORTP_POLICY LONGP_POLICY LAST_AUTOPRG_TIME LAST_MANUPRG_TIME
-------------------- -------------------- ---------------------------------------- ----------------------------------------
120 720 2016-07-07 23:27:37.789953 +05:00 2016-07-16 22:37:52.700123 +05:00
1 rows fetched

adrci>
Initially automatic purging runs 2 days after instance startup, then by policy defined interval.
Manual purging
- Type show homes to see current homes supported by ADRCI and set homepath.
[oracle@MAINDB ~]$ adrci

ADRCI: Release 12.1.0.2.0 - Production on Tue Feb 23 19:18:42 2016

Copyright (c) 1982, 2014, Oracle and/or its affiliates. All rights reserved.

ADR base = "/u01/app/oracle"

adrci> show homes
ADR Homes:
diag/tnslsnr/MAINDB/listener
diag/rdbms/cdb1/cdb1

adrci> set homepath diag/rdbms/cdb1/cdb1
- To purge diagnostic data that is older than the amount of time (minutes) given in the purge command. For ex to purge diagnostic data that is over 1 day old (1440 minutes).
adrci> PURGE -age 1440 -type ALERT

--You can also pruge TRACE files with same method:
adrci> PURGE -age 1440 -type TRACE
- To remove all data older than one minute use:
adrci> PURGE -age 1 -type ALERT
adrci> SHOW ALERT

ADR Home = /u01/app/oracle/diag/rdbms/cdb1/cdb1:
*************************************************************************

No alert log in selected home
adrci> exit
