Tuesday, May 5, 2020

How to add minutes to date in excel sheet


if you want to add one minute to cell, use this formula:=A2+1/1440, if you want to add one second to cell, use this formula: =A2+1/86400.


How To Quickly Add Hours/Minutes/Second To Date And Time In Excel?

For instance, you have a list of dates and times in a worksheet, and now you want to add the same hours/minutes/seconds to these cells which are mixed with date and time. You can use formulas to solve this task, but here I can tell you another trick to quickly attain this goal in Excel.

 Using Formulas To Add Hours/Minutes/Seconds To Datetime

In Excel, generally, you may use the formulas to add hours, minutes or seconds to the datetime cells.
1. Select the cell next to the first cell of the datetime list, and then type this formula =A2+1/24 into it, press Enter key and drag the auto fill handle over the cell needed this formula. See screenshots.
doc add hour minute second 2
doc add hour minute second 3
2. Then right click to select Format Cells from the context menu. And in the Format Cells dialog, under Number tab, select Custom from the Category list, then typem/d/yyyy hh:mm:ss into the Type textbox. See screenshots:
doc add hour minute second 4doc add hour minute second 5
3. Click OK. Then you can see each date and time cell is added one hour.
doc add hour minute second 6
Notes:
1. If you want to add one minute to cell, use this formula:=A2+1/1440, if you want to add one second to cell, use this formula: =A2+1/86400.
2. In above formulas, 1 indicates to add one hour or one minute or one second, you can change it as you need.
3. If you want to add hours, minutes and second to a date simultaneously, you can use this formula =A2+TIME(23,23,34), this means to add 23 hours, 23 minutes and 34 seconds to a date cell. But with this formula, you cannot add time over 24 hours.

Easily Add Days/Years/Month/Hours/Minutes/Seconds To A Datetime In Excel

Supposing you have a date time format data in a cell, and now you need to add a number of days, years, months, hours, minutes, or seconds to this date. Normally, using formula is the first method for all Excel users, but it’s hard to remember all formulas. With Kutools for Excel’s Date & Time Helper utility, you can easily add days, years, months, or hours, minutes or seconds to a date time, moreover, you can caculate the date difference, or the age based on a given birthday without remembering the formula at all. Click for full-featured free trial in 30 days!
doc add hour minute second
 
Kutools for Excel: with more than 300 handy Excel add-ins, free to try with no limitation in 30 days.

 Using A Handy Tool To Add Hours/Minutes/Seconds To Datetime

With above method is very easy, but here I can introduce another easier way to you, do you want to have a try?
To free install Kutools for Excel, you can use the powerful utility -- Date & Time helper to add hours, minutes or seconds without remembering.
Kutools for Excel, with more than 300 handy functions, makes your jobs more easier. 
After installing Kutools for Excel, please do as below:(Free Download Kutools for Excel Now!)
1. Select a cell to put the adding result, and click Kutools > Formula Helper > Date & Time helper. See screenshot:
doc add time 1
2. In the Date & Time Helper dialog, check Add option, click doc select button 1 
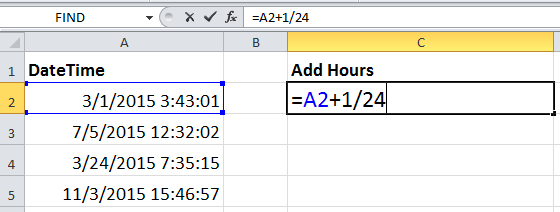
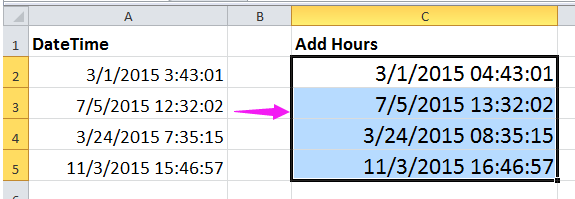
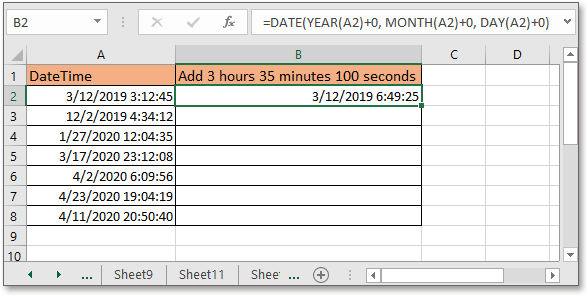
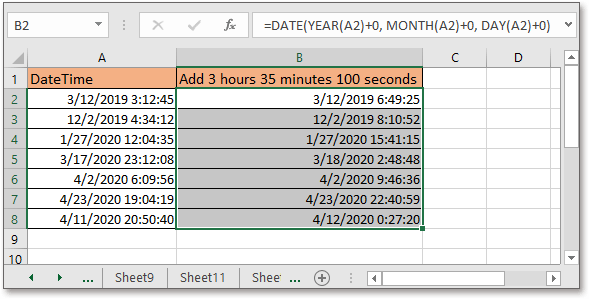
to select a cell that you use to add time,  then type the number of hours, minutes and seconds you want to add in the Enter number or select cells which contain values you want to add section, you can preview the adding result in Result section See screenshot:
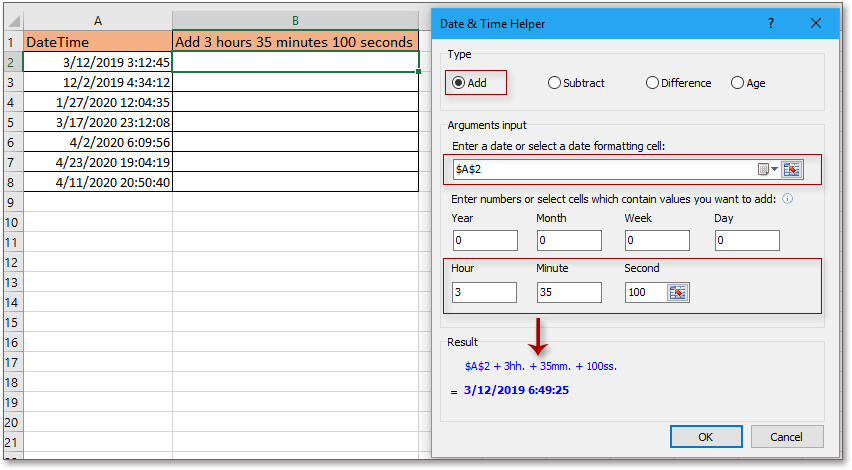
doc add hour minute second 8
3. Click Ok, then drag the autofill handle over cells needed the formula, see screenshot:
doc add hour minute second 9
doc kutools date time helper 4


The Best Office Productivity Tools

Kutools For Excel Solves Most Of Your Problems, And Increases Your Productivity By 80%

  • Reuse: Quickly insert complex formulas, charts and anything that you have used before; Encrypt Cells with password; Create Mailing List and send emails...
  • Super Formula Bar (easily edit multiple lines of text and formula); Reading Layout (easily read and edit large numbers of cells); Paste to Filtered Range...
  • Merge Cells/Rows/Columns without losing Data; Split Cells Content; Combine Duplicate Rows/Columns... Prevent Duplicate Cells; Compare Ranges...
  • Select Duplicate or Unique Rows; Select Blank Rows (all cells are empty); Super Find and Fuzzy Find in Many Workbooks; Random Select...
  • Exact Copy Multiple Cells without changing formula reference; Auto Create References to Multiple Sheets; Insert Bullets, Check Boxes and more...
  • Extract Text, Add Text, Remove by Position, Remove Space; Create and Print Paging Subtotals; Convert Between Cells Content and Comments...
  • Super Filter (save and apply filter schemes to other sheets); Advanced Sort by month/week/day, frequency and more; Special Filter by bold, italic...
  • Combine Workbooks and WorkSheets; Merge Tables based on key columns; Split Data into Multiple SheetsBatch Convert xls, xlsx and PDF...
  • More than 300 powerful features. Supports Office/Excel 2007-2019 and 365. Supports all languages. Easy deploying in your enterprise or organization. Full features 30-day free trial. 60-day money back guarantee.
kte tab 201905

Office Tab Brings Tabbed Interface To Office, And Make Your Work Much Easier

  • Enable tabbed editing and reading in Word, Excel, PowerPoint, Publisher, Access, Visio and Project.
  • Open and create multiple documents in new tabs of the same window, rather than in new windows.
  • Increases your productivity by 50%, and reduces hundreds of mouse clicks for you every day!
officetab bottom

Thursday, April 23, 2020

ORA-00060 Single-Resource Deadlock Occurs on Autonomous Transaction (Doc ID 1511700.1)

n this Document
Purpose
Scope
Details
 What is an Autonomous Transaction?
 Characteristics of Autonomous Transactions
 Autonomous Transactions and Deadlocks
  Example of Autonomous Deadlock
  ORA-60 Deadlock Trace File
References

APPLIES TO:

Oracle Database - Personal Edition - Version 8.1.7.0 and later
Oracle Database - Enterprise Edition - Version 8.1.7.0 and later
PL/SQL - Version 8.1.7.0 and later
Oracle Database - Standard Edition - Version 8.1.7.0 and later
Oracle Database Cloud Schema Service - Version N/A and later
Information in this document applies to any platform.

PURPOSE

NOTE: In the images and/or the document content below, the user information and data used represents fictitious data from the Oracle sample schema(s) or Public Documentation delivered with an Oracle database product. Any similarity to actual persons, living or dead, is purely coincidental and not intended in any manner.
 This document explains how deadlocks may occur with autonomous transactions

SCOPE

 This is article is intended for DBA's, Application Users and Support Engineers using autonomous transactions

DETAILS

What is an Autonomous Transaction?

An autonomous transaction is an independent transaction that can be called from within another transaction (called the main transaction). The autonomous transaction allows you to suspend the calling (main) transaction and then start the autonomous transaction to perform SQL operations and commit or undo them completely independently. Once the autonomous transaction is complete, you can then resume the calling transaction. An autonomous transaction is totally independent of the main transaction that called it. It is useful for actions that must be performed independently, regardless of whether the calling transaction commits or rolls back. For example, in a stock purchase transaction, you may want to commit customer data regardless of whether the overall stock purchase goes through.

Characteristics of Autonomous Transactions

Autonomous transactions have the following characteristics:
  • The autonomous transaction does not see uncommitted changes made by the main transaction and does not share locks or resources with the main transaction.
  • Changes in an autonomous transaction are visible to other transactions upon commit of the autonomous transactions. Thus, users can access the updated information without having to wait for the main transaction to commit.
  • Autonomous transactions can start other autonomous transactions. There are no limits, other than resource limits, on how many levels of autonomous transactions can be called.

Autonomous Transactions and Deadlocks

As stated above, the parent and child transactions are independent of each other and therefore act as separate transactional entities. Consequently, all the rules regarding locking between two transactions apply. If a parent transaction locks a resource needed by the child transaction then a deadlock situation occurs because the main transaction is momentarily suspended while the child autonomous transaction is active. The child transaction is in turn waiting for the main transaction to free the locked resource. We therefore have a situation where the parent transaction cannot progress until the autonomous transaction completes and the autonomous transaction is waiting for the parent transaction to free the locked resource. In this case, the offending statement will automatically be rolled back with an "ORA-00060: deadlock detected while waiting for resource" error raised within the child and a trace file is created as for all ORA-60 deadlocks. As there is actually only one session involved in the deadlock, the deadlock graph in the trace file contains a single-resource graph as seen below in the ORA-60 Deadlock Trace File
The only solution in this case to rewrite the code in order to avoid deadlock situations. Try to design your code such that two independent transactions do not need to accessing the same lock at the same time or if possible  commit or rollback a transaction before and after the autonomous transaction. Another possibility is to add exception handling routines to the PL/SQL code. For more information on PL/SQL error handling see:
Oracle® Database PL/SQL Language Reference
11g Release 2 (11.2)
11 PL/SQL Error Handling

 Example of Autonomous Deadlock

 -- Login to user/password , create table and populate --
sqlplus user/password
CREATE TABLE test_emp AS SELECT * FROM emp;
INSERT INTO test_emp
VALUES      (9999,
             '<User>',
             99,
             99,
             SYSDATE,
             10000,
             0,
             10);

COMMIT;

-- Create Procedure using autonomous transaction -- 
CREATE OR replace PROCEDURE Proc_a
AS
  PRAGMA autonomous_transaction;
BEGIN
    UPDATE test_emp
    SET    sal = sal + 5000
    WHERE  empno = 9999;

    COMMIT;
END;
/

-- Create Main Procedure --
CREATE OR REPLACE PROCEDURE Main_p
AS
BEGIN
    UPDATE test_emp
    SET    comm = 5000
    WHERE  empno = 9999;

    proc_a;

    COMMIT;
END;
/

-- Call Main Procedure --
SQL> exec main_p
BEGIN main_p; END;

*
ERROR at line 1:
ORA-00060: deadlock detected while waiting for resource
ORA-06512: at "PROC_A", line 5
ORA-06512: at "MAIN_P", line 4
ORA-06512: at line 1 


 ORA-60 Deadlock Trace File

As with other occurrences of ORA-60 deadlocks, a trace file is created that includes a deadlock graph and information on the session.
With an autonomous transaction, there is only one session involved and the deadlock graph contains only one row where both blocker and waiter are the same session as shown in the following example:
Autonomous_deadlock_graph
As well as the deadlock graph, the trace file contains PROCESS STATE information. The information below shows different sections of the trace file that may be of interest:
Deadlock Trace file
Self deadlock can occur for a number of diverse reasons. Usually the deadlock is a standard application deadlock introduced in a single session by some means. However if you encounter such a deadlock that does not match this profile then the recommended action is to consider create a Service Request with Support having collected trace diagnostics using the following article:

Document 1552194.1 ORA-00060 Deadlock Graph Not Matching any Examples: Suggested Next Steps

Tuesday, April 21, 2020

Retrieve Apps password in R12 or Forgot Apps Password in R12

Retrieve Apps password in R12 or Forgot Apps Password in R12


Steps to retrieve forgotten apps password in R12

Step 1 : login to DB-Node

sqlplus / as sysdba

STEP 2 : Create Function for to decrypt the encrypted password


SQL> create FUNCTION apps.decrypt_pin_func(in_chr_key IN VARCHAR2,in_chr_encrypted_pin IN VARCHAR2)
RETURN VARCHAR2
AS
LANGUAGE JAVA NAME 'oracle.apps.fnd.security.WebSessionManagerProc.decrypt(java.lang.String,java.lang.String) return java.lang.String';
/

Function created.

STEP 3 : (Query for password)


SQL> select ENCRYPTED_FOUNDATION_PASSWORD from apps.fnd_user where USER_NAME='GUEST';


Output

ENCRYPTED_FOUNDATION_PASSWORD
--------------------------------------------------------------------------------
ZG37E123746712BDB2D99E048FE44AE662F2713E2EDB443391BABA0414CADDB7A2E6DD45BBAFA7270A663E5EEBA837F5548A

STEP 4:

SELECT apps.decrypt_pin_func('GUEST/ORACLE','ZG37E123746712BDB2D99E048FE44AE662F2713E2EDB443391BABA0414CADDB7A2E6DD45BBAFA7270A663E5EEBA837F5548A') from dual;


Output

APPS.DECRYPT_PIN_FUNC('GUEST/ORACLE','ZG37E123746712BDB2D99E048FE44AE662F2713E2EDB443391BABA0414CADDB7A2E6DD45BBAFA7270A663E5EEBA837F5548A')
--------------------------------------------------------------------------------
DEMONSTRATE

STEP 5: (Test apps password)

SQL> conn apps/DEMONSTRATE;
Connected.

CHEERS :)

Monday, January 27, 2020

Oracle E-Business Suite Release 12.2: Backup and Recovery Guidelines For Online Patching (adop) Cutover (Doc ID 1584097.1)

This document describes how you can, if required, restore an Oracle E-Business Suite Release 12.2 system to the state it was in before an Online Patching cutover phase was run. It is only intended for use in specific scenarios where cutover has failed for some reason.
Note: This document supplements the main Online Patching documentation, which is primarily provided in Oracle E-Business Suite Concepts and Oracle E-Business Suite Maintenance Guide. Both these books are available as part of the Release 12.2 Documentation Library.

In This Document

  1. Prerequisites and Restrictions
  2. Setting Up Flashback
  3. Problem Scenario
  4. Flashing Back the Database
  5. Restoring the File Systems
  6. References
  7. Change Record
  8. Documentation Notices

1. Prerequisites and Restrictions

Oracle E-Business Suite Release 12.2 supports Online Patching, which allows patches to be applied to a copy of the system while users are working on the existing system. The Online Patching cycle consists of several phases, with the critical phase where the changes are committed being called cutover. Up to this phase, you can run a special phase called abort, which will undo the changes made so far in the patching cycle. After cutover is complete, however, you cannot do this.
Note: The procedure described in this document is only intended for use in the event of a failed cutover, and as a last resort. It is not supported for use as a rollback (restoration) option after a successful cutover.
If a cutover error occurs, you should first check the error message and try to determine if the problem can be fixed easily, or (as is true in many cases) cutover can be made to succeed simply by running the command again. Restoring to a point before cutover via Flashback recovery should only be done when the error cannot easily be fixed, and continues to fail on subsequent cutover attempts.
So, before proceeding further with the instructions in this document:
  1. Review failure messages and cutover logs, identify problems, and make corrections as applicable. Issues such as running out of disk space can be corrected easily, whilst issues such as timeouts, deadlocks, and network issues may prove to be transient.
  2. Retry the cutover command.
  3. If cutover still fails, follow the instructions in the rest of this document to restore system availability while you take further diagnostic and corrective actions.
If after cutover you want to revert to the state of the system before the patching cycle was started, you can use the Oracle Database Flashback feature to go back to a designated point in time (a restore point). You should create the restore point just before running the cutover phase.
Note: Before creating the restore point, it is advisable to issue a suitable downtime notification and shut down the web services. This will ensure you do not lose any transactional data, and in effect simply extends slightly the cutover downtime.
Depending on exactly when the failure occurred, you may also need to restore the application tier file systems.
Note: The following prequisites must be met before you proceed with the instructions in this document:
  1. You are ready to perform cutover.
  2. All concurrent managers have been shut down cleanly.
  3. There are no current database transactions being performed by any third-party applications.

2. Setting Up Flashback

All the steps in this section are performed on the database tier, as sysdba.

2.1 Set ARCHIVELOG mode

Ensure the database is in ARCHIVELOG mode. Refer to the documentation on Changing the Database Archiving Mode.

2.2 Enable Fast Recovery Area

You enable the Fast Recovery Area (FRA) by setting two database initialization parameters:
  • DB_RECOVERY_FILE_DEST_SIZE - Specifies the size of the Fast Recovery Area.
  • DB_RECOVERY_FILE_DEST - Specifies the physical location of the Flashback recovery files.
Note: If you are using the Fast Recovery Area to store RMAN backups to disk, the FRA needs to be sized to hold all your datafiles, any incremental backups, and the flashback logs generated during cutover.
If you are not using the Fast Recovery Area to store RMAN backups, the FRA only needs to be large enough to contain the flashback logs for the duration of cutover. The size will depend on your selected retention policy (based on the time needed to perform cutover), and should be sufficient to accommodate your online redo log files. If you set the size too small, you may experience space availability issues, resulting in restoration failure. It is therefore advisable to monitor space utilization: any shortages will be recorded in the database alert log.
To minimize FRA space requirements, the Online Patching cutover phase should be scheduled for a time when there are few online transactions, and batch processing is minimal.
SQL>alter system set db_recovery_file_dest_size = 10G scope=BOTH SID='*';System altered.
SQL>alter system set db_recovery_file_dest = '/d1/oracle/test/ARCH' scope=BOTH SID='*';
System altered.
Note: It is generally advisable to use a server parameter file ("spfile") for managing the database initialization parameters. Refer to the documentation on Managing Initialization Parameters Using a Server Parameter File.

2.3 Specify maximum flashback time

The next command specifies the maximum number of minutes the database may be flashed back. This parameter determines how much flashback log data is kept in the recovery area.
SQL>alter system set db_flashback_retention_target=120;
System altered.
Note: The amount of retention time and space needed will be governed by the amount of time required for cutover. Setting the flashback retention target too high may result in issues if DB_RECOVERY_FILE_DEST_SIZE is set to a large value.

2.4 Activate Flashback

Flashback is activated using the following command:
SQL>alter database flashback on;
Database altered.

2.5 Create restore point

This step will create a restore point called BEFORE_CUTOVER. As shown in the example below, it is also recommended to force a logfile switch both before and after the restore point is created.
SQL>alter system switch logfile;
System altered.
SQL>create restore point BEFORE_CUTOVER guarantee flashback database;
Restore point created.

SQL>alter system switch logfile;
System altered.
You are now ready to flashback the database if needed.
Note: As noted under the FRA description, the Online Patching cutover phase should be scheduled for a time when there are few online transactions and batch processing is minimal. You should confirm that critical concurrent requests are not executing during cutover.  You should also consider putting scheduled concurrent requests on hold prior to creating the BEFORE_CUTOVER flashback restore point.

3. Problem Scenario

You are running an Online Patching cycle:
$ adop phase=prepare...
$ adop phase=apply patches=11111111,22222222
...
$ adop phase=finalize
...
$ adop phase=cutover
Cutover fails, and you need to go back to the state of the system before you ran the cutover phase.
Note: If you had not run the cutover phase, you would have been able to roll back the patch application process by running the adop abort phase. However, this is not possible once cutover has been run.
There are two main parts to the restore procedure:
  • You will at least need to restore the database using the Flashback feature (described in Section 4)
  • Depending on when cutover failed, you may also need to restore the application tier file systems (described in Section 5).
These activities will be considered in the next two sections.

4. Flashing Back the Database

  1. First, shut down the database, then start it up in mount state:
    SQL>shutdown immediate
    Database closed.
    Database dismounted.
    ORACLE instance shut down.
    SQL>startup mount
    ORACLE instance started.
  2. Restore the flashback to the specified restore point:
    SQL>flashback database to restore point BEFORE_CUTOVER;
    Flashback complete.
  3. Start the database in read-only mode:
    SQL>alter database open read only;
    Database altered.
    Check all looks as expected.

  4. Shut down the database, start it up in mount state, then open it with the resetlogs option:
    SQL>shutdown immediate
    Database closed.
    Database dismounted.
    ORACLE instance shut down.
    SQL>startup mount
    ORACLE instance started.
    Total System Global Area 2142679040 bytes
    Fixed Size 1346140 bytes
    Variable Size 520095140 bytes
    Database Buffers 1593835520 bytes
    Redo Buffers 27402240 bytes
    Database mounted.
    SQL>alter database open resetlogs;
    Database altered.
  5. Disable flashback:
    SQL>alter database flashback off;
    Database altered.
  6. Drop the restore point:
    SQL>drop restore point BEFORE_CUTOVER;
    Restore point dropped.
  7. Set recovery file destination:
    SQL>alter system set db_recovery_file_dest='';
    System altered.
  8. Confirm that Flashback has been deactivated:
    SQL>select FLASHBACK_ON from v$database;
    FLASHBACK_ON
    ------------
    NO
This concludes the Flashback activities.
Note: If you are not using FRA, you may want to clean up the flashback space (unless you intend to keep it for the next adop cycle).

5. Restoring the File Systems

Whether you need to perform this step is conditional, depending on whether cutover failed before the file systems were switched. You can identify which of these cases applies by referring to the cutover logs in $NE_BASE/EBSapps/log/adop/<current_session_id>/cutover_<timestamp>/ for your current session id.
Case 1 - If the log messages indicate that cutover failed before the file systems were switched, do a clean shutdown of any services that are running. Then restart all the services using the normal startup script, and go to Section 6.
Case 2 - If the log messages indicate that cutover failed after the file systems were switched, follow Step 5.1 to shut down any services that have started from the new run file system, then follow Step 5.2 to switch the file systems back. After that, go to Section 6.

5.1 Shut down services started from new run file system

  1. Source the environment on the new run file system.
  2. From $ADMIN_SCRIPTS_HOME, shut down all the services (using adstpall.sh on UNIX).
  3. In a multi-node environment, repeat the preceding two steps on all nodes, leaving the admin node until after all the slave nodes.

5.2 Switch file systems back

  1. On all nodes where file systems have been switched, run the following command to switch the file systems back:
    $ perl $AD_TOP/patch/115/bin/txkADOPCutOverPhaseCtrlScript.pl \
    -action=ctxupdate \
    -contextfile=<full path to new run context file> \
    -patchcontextfile=<full path to new patch file system context file> \
    -outdir=<full path to out directory>
  2. Start up all services from the old run file system (using adstrtal.sh on UNIX).
  3. In a multi-node environment, repeat the preceding two steps on all nodes, starting with the admin node and then proceeding to the slave nodes.

6. Options and Next Steps

After the restore is complete, you have two basic options for proceeding:
  • Abort the current patching cycle, if the issue that required you to restore was caused by the patches you were attempting to apply.
  • Identify and fix any other issues in the current patching cycle, and proceed with patching.

7. References

For more information on the database features involved, plus guidance on setting the parameters to meet your specific requirements, refer to:
  • Chapter 5, Configuring the RMAN Environment, in Oracle Database Backup and Recovery User's Guide 11g Release 2 (11.2), Part No. E10642.
For more information on the Oracle E-Business Suite Online Patching cycle, refer to:
  • Chapter 3, Patching Procedures, in Oracle E-Business Suite Maintenance Guide, Part No.E22954.

7. Change Record

DateDescription
02-Jun-2014
  • Added adop to title.
21-Oct-2013
  • Made minor additions.
05-Sep-2013
  • Added prerequisites.
30-Aug-2013
  • Updated FRA sizing guidance.
28-Aug-2013
  • Updated Section 5.
09-Aug-2013
  • Initial creation.
My Oracle Support Knowledge Document 1584097.1 by Oracle E-Business Suite Development

8. Documentation Notices

Copyright © 2013, 2014, Oracle and/or its affiliates. All rights reserved.
This software and related documentation are provided under a license agreement containing restrictions on use and disclosure and are protected by intellectual property laws. Except as expressly permitted in your license agreement or allowed by law, you may not use, copy, reproduce, translate, broadcast, modify, license, transmit, distribute, exhibit, perform, publish, or display any part, in any form, or by any means. Reverse engineering, disassembly, or decompilation of this software, unless required by law for interoperability, is prohibited.
The information contained herein is subject to change without notice and is not warranted to be error-free. If you find any errors, please report them to us in writing.
If this is software or related documentation that is delivered to the U.S. Government or anyone licensing it on behalf of the U.S. Government, the following notice is applicable:
U.S. GOVERNMENT END USERS: Oracle programs, including any operating system, integrated software, any programs installed on the hardware, and/or documentation, delivered to U.S. Government end users are "commercial computer software" pursuant to the applicable Federal Acquisition Regulation and agency-specific supplemental regulations. As such, use, duplication, disclosure, modification, and adaptation of the programs, including any operating system, integrated software, any programs installed on the hardware, and/or documentation, shall be subject to license terms and license restrictions applicable to the programs. No other rights are granted to the U.S. Government.
This software or hardware is developed for general use in a variety of information management applications. It is not developed or intended for use in any inherently dangerous applications, including applications that may create a risk of personal injury. If you use this software or hardware in dangerous applications, then you shall be responsible to take all appropriate fail-safe, backup, redundancy, and other measures to ensure its safe use. Oracle Corporation and its affiliates disclaim any liability for any damages caused by use of this software or hardware in dangerous applications.
Oracle and Java are registered trademarks of Oracle and/or its affiliates. Other names may be trademarks of their respective owners.
Intel and Intel Xeon are trademarks or registered trademarks of Intel Corporation. All SPARC trademarks are used under license and are trademarks or registered trademarks of SPARC International, Inc. AMD, Opteron, the AMD logo, and the AMD Opteron logo are trademarks or registered trademarks of Advanced Micro Devices. UNIX is a registered trademark of The Open Group.
This software or hardware and documentation may provide access to or information on content, products, and services from third parties. Oracle Corporation and its affiliates are not responsible for and expressly disclaim all warranties of any kind with respect to third-party content, products, and services. Oracle Corporation and its affiliates will not be responsible for any loss, costs, or damages incurred due to your access to or use of third-party content, products, or services.
For information about Oracle's commitment to accessibility, visit the Oracle Accessibility Program website at http://www.oracle.com/pls/topic/lookup?ctx=acc&id=docacc.
Access to Oracle Support
Oracle customers have access to electronic support through My Oracle Support. For information, visit http://www.oracle.com/pls/topic/lookup?ctx=acc&id=info or visit http://www.oracle.com/pls/topic/lookup?ctx=acc&id=trs if you are hearing impaired.

12.2 E-Business Suite Applications DBA Steps To Check if a Patch is Applied in 12.2.x using SQL*PLUS (Doc ID 1963046.1)

APPLIES TO:

Oracle E-Business Suite Technology Stack - Version 12.2 to 12.2.7 [Release 12.2]
Oracle Applications Manager - Version 12.2 to 12.2.7 [Release 12.2Cloud to 12.2]
Oracle Trade Management - Version 12.2 to 12.2.7 [Release 12.2]
Oracle Application Object Library - Version 12.2 to 12.2.7 [Release 12.2]
Oracle Applications DBA - Version 12.2 to 12.2.7 [Release 12.2Cloud to 12.2]
Information in this document applies to any platform.

GOAL

The purpose of this document is to explain how to check if a Patch is applied on an environment in Release 12.2.x.

SOLUTION

In eBusiness Suite (EBS) 12.2.x you cannot query the AD_BUGS table to check if patches have been applied.
The AD_BUGS table may have entries for patches that were applied but later the patching cycle was aborted (not really applied).
To check whether a patch is really applied use the AD_PATCH.IS_PATCH_APPLIED pl/sql function.
Using this API is an alternative method for users without access to Oracle Applications Manager's "Patching and Utilities" feature to determine if a certain patch is applied.

Usage:
select AD_PATCH.IS_PATCH_APPLIED(\'$release\',\'$appl_top_id\',\'$patch_no\',\'$language\')
from dual;
To obtain the appl_top_id use the following select to list the appl_tops:
SELECT APPL_TOP_ID , NAME , DESCRIPTION , APPLICATIONS_SYSTEM_NAME , ACTIVE_FLAG FROM APPLSYS.AD_APPL_TOPS;
 
Example sql using the APPL_TOP ID for a specific node in a multinode environment (1045 is the APPL_TOP ID):
SELECT adb.bug_number,ad_patch.is_patch_applied('R12', 1045, adb.bug_number)
FROM ad_bugs adb
WHERE adb.bug_number in (20034256);

or for single app tier installations:
select ad_patch.is_patch_applied('R12',-1,20034256) from dual;
expected results:
EXPLICIT = applied
NOT APPLIED = not applied / aborted

Note: If you are sure patch is applied but it is not showing as applied via the above steps, then update the snapshot manually with the steps below:
1. Start adadmin after source the RUN FS env.
2. Select "2. Maintain Applications Files menu" in "AD Administration Main Menu".
3. In "Maintain Applications Files", select "4. Maintain snapshot information".
4. Select "2. Update current view snapshot" in the "Maintain Snapshot Information".
5. Select "1. Update Complete APPL_TOP" in the "Maintain Current View Snapshot Information".

Friday, January 10, 2020

E-Business Suite Applications Technology Stack Utility / Script To Check The Techstack Component Versions (Forms, Http Server, JDK, Framework, Database, etc) (Doc ID 601736.1)

APPLIES TO:

Oracle E-Business Suite Technology Stack - Version 11.5.10.2 to 12.2 [Release 11.5.10 to 12.2]
Information in this document applies to any platform.

GOAL

How to find the versions of Technology stack components like Forms, iAS, Framework, JDK, OJSP, Database, etc.?

SOLUTION

On Application Tier
  1. Establish the needed environment parameters by sourcing the Applications environment file as the owner of the application tier file system.
  2. Ensure "APPLRGF" variable is set in environment. If not, set it to the same value as "APPLTMP" (Note: If you set the output file directory using -outfile parameter, skip this step and the file will be generated under $APPLRGF/TXK directory).
  3. Navigate to <FND_TOP>/patch/115/bin. Run the utility/command  as follows :

    Operation System
     
    Command Line
    Unix or Linux$ADPERLPRG $FND_TOP/patch/115/bin/TXKScript.pl \
    -script=$FND_TOP/patch/115/bin/txkInventory.pl -txktop=$APPLTMP \
    -contextfile=$CONTEXT_FILE \
    -appspass=apps \
    -outfile=$APPLTMP/Report_App_Inventory.html

    Note:
    - Run the above command in single line
    - Remove the '\' after each parameter when running the command on a single line
    - Supply the apps user password as is applicable for parameter "-appspass"
    Windows­PERLPRG% %FND_TOP%\patch\115\bin\TXKScript.pl
    -script=%FND_TOP%\patch\115\bin\txkInventory.pl
    -txktop=%APPLTMP% -contextfile=%CONTEXT_FILE%
    -appspass=apps
    -outfile=%APPLTMP%\Report_App_Inventory.html
    Note:
    - Run the above command in single line
    Remove the '\' after each parameter when running the command on a single line
    - Supply the apps user password as is applicable for parameter "-appspass"

    Where:
      
    txktopTemporary working directory use by Perl Modules. Should not be an empty string.
    contextfileLocation of the context file. If not passed, default is picked from the environment.
    appspassAPPS schema password. If not passed, default password is used.
    outfileLocation for the report being generated. If not passed, the default location is <APPLTMP>/TXK

    To generate the report in text format, the parameter "-reporttype=text" needs to be passed to the above commands. For example:
    outfile=$APPLTMP/Report_App_Inventory.txt -reporttype=text
  4. Once the command executes successfully, it should generate the report file in the location specified for "outfile" parameter in above script
  5. In case you have more than one application tier's (multi-node architecture), follow the steps 1-4 on each of the Application tiers
  6. Upload the report output file (default: $APPLTMP/Report_App_Inventory.html )to Oracle Support for review

On Database Tier
  1. Establish the needed environment parameters by sourcing the Database environment file as the owner of the Database tier file system. |
  2. Ensure "ORACLE_HOME" variable is set in environment and correctly pointing to your database ORACLE_HOME.
  3. Navigate to <ORACLE_HOME>/appsutil/bin. Run the utility/command as below (all on a single line):

    Operation System 
                                              
    Command Line
    Unix or Linux$ADPERLPRG $ORACLE_HOME/appsutil/bin/TXKScript.pl
    -script=$ORACLE_HOME/appsutil/bin/txkInventory.pl -txktop=$ORACLE_HOME/appsutil/temp
    -contextfile=$CONTEXT_FILE
    -appspass=apps
    -outfile=$ORACLE_HOME/appsutil/temp/Report_DB_Inventory.html
    Note:- Run the above command in single line
    - Supply the apps user password as is applicable for parameter "-appspass"
    Windows­PERLPRG% %ORACLE_HOME%/appsutil/bin/TXKScript.pl
    -script=%ORACLE_HOME%/appsutil/bin/txkInventory.pl -txktop=%ORACLE_HOME%/appsutil/temp
    -contextfile=%CONTEXT_FILE%
    -appspass=apps
    -outfile=%ORACLE_HOME%/appsutil/temp/Report_DB_Inventory.html
    Note:
    - Run the above command in single line
    - Supply the apps user password as is applicable for parameter "-appspass"

    Where
     
      
    txktopTemporary working directory use by Perl Modules. Should not be an empty string.
    contextfileLocation of the context file.
    appspassAPPS schema password.
    outfileLocation for the report being generated.

    To generate the report in text format, the parameter "-reporttype=text" needs to be passed to the above commands. For example:

    outfile=$ORACLE_HOME/appsutil/temp/Report_DB_Inventory.txt -reporttype=text
  4. Once the command executes successfully, it should generate the report file in the location specified for "outfile" parameter in above script
  5. Upload the report output file (default: $ORACLE_HOME/appsutil/temp/Report_DB_Inventory.html ) to Oracle Support for review

Oracle E-Business Suite Release 12.2 System Schema Migration

In This Document Section 1: Overview of the EBS System Schema Section 2: Requirements for Using the EBS System Schema Section 3: Migrating t...